|
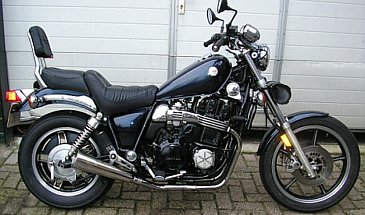
Maxim-X Front Wheel |
||||||||||||||||||||||||||||||||||||||||||||||||||||||||||||||||||||||||||
|
As far as I know, no such modification to the front wheel of a Maxim-X has ever been tried so the idea can be credited to an XJer from Ottawa, Ontario, Canada named John Bailes. John was kind enough to provide the necessary information for others to make the same modification if they're interested. Surprisingly, there isn't much involved. 1 • Wheel Rim
The first thing you need to do is replace the stock Maxim-X cast wheel rim (Yamaha Part# 42H-25168-00-98) with one from either a 1986 Yamaha FZX700S Fazer or a 1987 Yamaha FZX700T Fazer (Yamaha Part# 1UF-25168-00-35). The original Maxim-X front wheel has a gloss black 2.15"x19" cast rim as compared to the Fazer's silver 2.50"x16" cast rim. They're substantially different in both size and appearance.
When you install the Fazer front wheel, don't forget to properly torque the 17mm hex front axle bolt to 75 ft•lbs (105 N•m, 10.5 kg•m), and the 12mm hex front axle pinch bolt/nut to 14 ft•lbs (168 in•lbs, 20 N•m, 2.0 kg•m).
2 • Tire
The next thing you'll need is a different tire. From the factory, the Maxim-X comes with a 100/90-19 mounted which has a width of 100mm and a depth of 90% of the width or 90mm. Although the Fazer front wheel will probably include the Fazer's stock 110/90-16 tire, for the pictured modification you'll want to replace the stock Fazer tire with a more substantial 130/90-16 tire with a width of 130mm and a depth of 117mm (coincidentally the same size as the tire mounted on the rear of the Maxim-X... so you end up with identical wheel/tire sizes front and back) .
3 • Speedo Drive & Cable
As you can imagine, mounting a new wheel isn't as simple as just swapping one out and a different one in. Although the front axle, bearings and spacer don't need changing, apparently the speedo drive does. John didn't mention whether the Fazer speedo drive would work (he probably bought the Fazer wheel sans-speedo drive) but he was able to use a 650/750 Maxim speedo drive he had lying around. John wasn't specific as to which model/year of Maxim otherwise I would have provided a part number. I'll try to dig up and post that information later.
John also used the shorter speedo cable from the same bike where he got the speedo drive. He wasn't clear about why the cable needed to be changed though I suspect it's not directly related to the changing oif the front wheel. More than likley John tinkered with his fork length and ended up with far too much slack in the stock speedo cable. That's probably why he needed something shorter. I'll try to pry that information out of him as well. Since it's possible that others will do the same tinkering, I'll say this - just keep the length of the speedo cable in mind as well.
4 • Brake Calipers
When attempting to remount the Maxim-X brake calipers, you'll soon realize that they don't align properly with the Fazer brake rotors. According to John, the Maxim-X brake rotors are 6.30mm more separated than those of the Fazer making modification necessary. To accommodate the difference, the calipers must be offset by inserting two 3.15mm thick washers between each caliper and its respective fork which will shift the calipers closer to the centreline of the wheel and bring them into proper alignment with the Fazer brake rotor offset.
As for the rotor thicknesses - apparently they don't differ enough to be of any concern.
One final word of caution - the Maxim-X caliper bolts are the most commonly stripped bolts on the entire bike. You'd be wise to torque the four 10mm hex bolts properly to 25 ft•lbs (300 in•lbs, 35 N•m, 3.5 kg•m).
5 • Front Fender
In the table above (in section #2), you'll see that the overall height of the front wheel after the modification is roughly 1" less. That leaves a large and unsightly gap between the front fender and the tire. As such, you'll also have to fabricate some spacers to offset the fender from the fork brace.
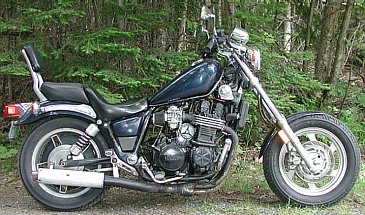
The clearance between the fender and the tire is obviously something you can adjust to your liking but in order to get the clearance pictured below, you'll apparently need two different lengths of 16mm O.D. spacers - the rear being 26.7mm long and the front being 22.7mm long. And because there will now be spacers between the fender and fork brace, you'll also need longer bolts to attach the two parts. John didn't specify the bolt size beyond the necessary length of 34mm so it's up to you to source something with the same thread size and a 34mm length. Unfortunately the service manual also doesn't help identify the thread size, nor does it say anything about the torque specification for the lower fender bolts so excercise caution when torquing them. I suspect the lower fender bolts will be the same as the upper M6xP1.0 and will likely have the same torque specification of 6.5 ft•lbs (78 in•lbs, 9 N•m, 0.9 kg•m)... but I wouldn't swear to it so be careful.
I didn't have an opportunity to take John's modified Maxim-X out on the highway for an extended run but John certainly did and he's sure that the fender clearance pictured above is nothing to worry about. He didn't see any signs of the tire expanding enough to contact the fender. However, if you're planning to achieve a smaller fender-to-wheel clearance or if you choose to use a narrower tire, then fender contact becomes something to consider. Keep tire expansion at high speed in the back of your mind.
6 • Kickstand
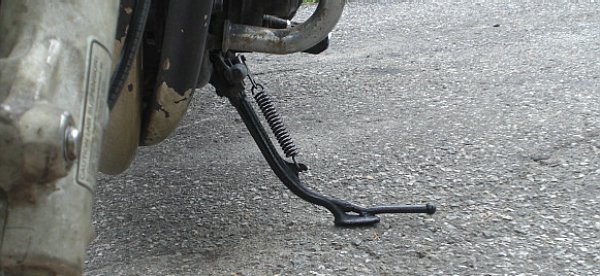
Modifying the front wheel in this way comes at a small cost of convenience. With the 1" shorter front wheel, the geometry of the motorcycle shifts slightly and may cause kickstand issues. In John's case, he also lowered the rear of the bike by installing significantly shorter shocks. The combined effect of the lowered rear and front ends made it absolutely impossible for a single individual to raise the motorcycle onto the centre stand - that became a two-man job and even then it wasn't easy. The shorter overall height also meant that John's side stand became too long for the new geometry. The bike wasn't able to lean to one side - it stayed essentially vertical - so John had to shorten the side stand by heating it with a torch and bending it as pictured below.
Although the side stand problem might not be as pronounced with stock rear shocks, it's still likely that shortening the front end by changing the wheel (and maybe raising the forks in the triple tree) will alter the effectiveness of the side stand and centre stand. So take that into consideration before you commit to this modification.
7 • More to Consider
Besides the obvious visual impact of swapping the front wheel, installing a smaller Fazer front wheel also effects the handling of the Maxim-X. When I test rode John's modified X, I found that the front end felt heavier (for obvious reasons). And although I didn't feel that steering was impaired in any way, it was a completely difference dynamic. Throwing the bike from one side to the other in a series of turns made it clear that steering wasn't as flexible - it was slower to respond. I did, however, get the impression that the bike was more inclined to drive straight ahead - it felt very solid in straight runs.
Another less obvious change involves fuel mileage. Fuel economy is bound to suffer a bit but what may be more important is that your distance to reserve may drop substantially and the overall mileage on a full tank of fuel may actually increase. How, you ask? The Maxim-X has two vertical fuel inlet tubes above the petcock which is toward the narrower rear of the fuel tank. When the rear of the bike is dropped (ex. passenger or shocks lowered), fuel in the tank flows away from the wider front of the tank toward the narrower rear of the tank which has the effect of raising the fuel level at the point of the fuel inlet tubes. That means it will take longer for the level to drop to the point of the reserve inlet. Of course the opposite is true when the front end is lowered - you reach reserve sooner. But since the Maxim-X fuel tank is slanted slightly upward toward the front and the petcock is not at the very rear of the tank, there is always a certain amount of fuel left sloshing around in the tank after you run out. It's not a lot but it's there nonetheless. So as you lower the front end, the fuel tank approaches a more level orientation which allows more of the otherwise inaccessible fuel at the back of the tank to reach the petcock and inevitably the engine. That will give the appearance of better gas mileage by way of going farther on a tank of gas, but it's only an illusion. Still, it's worth knowing in advance that tinkering with the orientation of the Maxim-X results in unexpected changes to fuel mileage breakpoints.
|
||||||||||||||||||||||||||||||||||||||||||||||||||||||||||||||||||||||||||