|
Maxim-X Spark Plug Well Drains |
||||||||||||||||||||
|
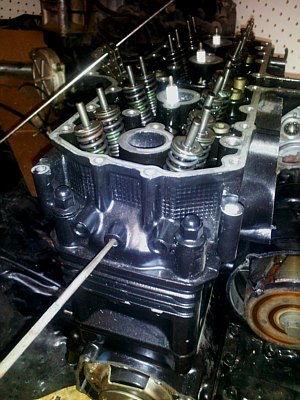
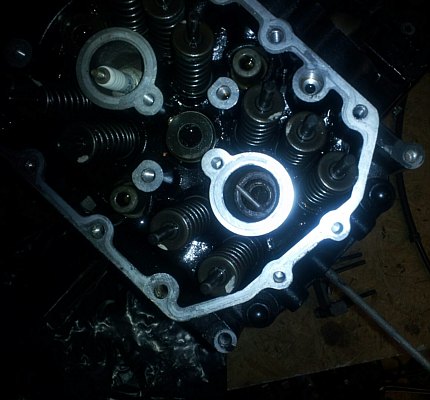
Once I saw these two pictures, it suddenly all became clear... all except the drain holes which still needed clearing. Upon closer examination, I could see that the drain holes were actually two passages. On the left side of the bike, the exit hole is hidden under the left side engine cooling fins and the passage reaches in from the exit hole, across the #1 spark plug hole and then across the #2 spark plug hole, ending at the right side of the #2 plug well. Similarly, on the right side of the bike, the exit hole is hidden under the right side engine cooling fins and the passage reaches in from the exit hole, across the #4 spark plug hole and then across the #3 spark plug hole, ending at the left side of the #3 plug well. So the left side has a drain passage connecting both left spark plug wells and the right side has a drain passage connecting both right spark plug wells. 1 • Chose Appropriate Passage Clearing Tool
I found that a brass rod of 1/8" diameter was an appropriate tool for clearing the clogged drain passages. It could just as easily have been a steel, aluminum or even wooden rod, as long as the diameter was 1/8" (or very close) and as long as it was long enough to reach across two adjacent plug wells.
2 • Clean Spark Plug Holes First
When you first attempt to clear the drain passages, you'll soon discover that the spark plugs themselves block the way and prevent your 1/8" rod from getting through all the way, past the outer plug to the inner inner one. So it becomes necessary to remove the spark plugs in order to properly clear the clogged drain passages. But before you remove any spark plugs, remember to use compressed air to blow any loose dirt and debris out of all the spark plugs wells first.
3 • Decide How to Seal the Spark Plug Holes
You'll definitely have to seal the spark plug holes before clearing the drain passages but that's not as straightforward as it sounds. If you examine the right side picture above, you'll notice that the rod passes over the spark plug holes, offset a bit to the front of the engine. So whatever you seal the spark plug holes with would have to take that alignment into consideration.
I first thought of using rubber caps like the ones on the intake manifold vacuum test nipples. The right sized rubber caps, used upside down of course, might have gone in to just below the rod, allowing it to pass overhead to the next plug well. But I was afraid of the possibility of losing one of those rubber caps inside a cylinder so I started considering other ways to accomplish the same thing. That's when I settled on the idea of a dowel. A dowel could plug the spark plug hole and, if narrow and long enough, could even be dropped into the cylinder and still be removed afterward. The problem with a dowel, however, is that it would block the rod's path just like the spark plug did. But wood is an easy material to work with so I decided wooden dowels were a good way to proceed. 4 • Cut Spark Plug Hole Sealing Dowels
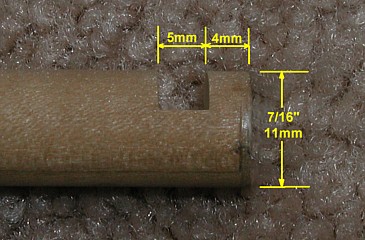
To solve the problem of getting the rod past a dowel, it's a simple matter of sinking the dowel to a controllable height and cutting a groove into it right where the rod would pass by.
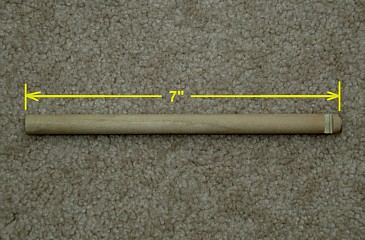
In the end I chose a 7/16" wooden dowel (soft wood like pine). That diameter is narrow enough to get the rod to catch the first couple of threads of the spark plug hole but too big to go any farther. So the 7/16" diameter would inherently insure that the dowels, all of them, would sink to essentially the same depth (+/-). And with the same depth as a starting point, the groove needed to allow the rod to pass could be cut at a defined point... that being about 4mm from the end of each rod with a groove width of at least 5mm (see left picture below). I cut the groove with two passes of a radial arm saw but it could just as easily have been done with a table saw, chop saw, hand saw or even a rasp.... whatever's convenient. But the groove need only be a few millimeters deep.... much less than I've shown in the pictures below. It only needs to be deep enough to allow the rod to pass but it's not especially important if you want to make it deeper. As for the width of the groove, 5mm is much more than the diameter of the 1/8" rod but it provides some tolerance in case one person threads a dowel into a spark plug hole farther than the next person. In any case, cutting a 5mm groove 4mm from the end of each dowel is appropriate to make room for the 1/8" rod to pass by without trouble. It's also helpful to make the dowels 7" long to clear the cam cover so you can get a good grip on them while still staying clear of the frame (see right picture below).
5 • Mark The Spark Plug Hole Sealing Dowels
Marking the opposite end of each dowel to show the alignment of the groove at the other end will help with aligning the grooves when they disappear below the cam cover and into the deep spark plug wells (see picture below).
6 • Remove Spark Plugs
When you first attempt to clear the drain passages, you'll soon discover that the spark plugs themselves block the way and prevent your 1/8" rod from getting through all the way, past the outer plug to the inner one. So it becomes necessary to remove the spark plugs in order to properly clear the clogged drain passages. But before you remove any spark plugs, remember to use compressed air to blow any loose dirt and debris out of all the spark plugs wells first.
After the plug wells are clean, you can remove the spark plugs but by no means should you attempt to clear the drain passages yet because the accumulated dirt and debris will be pushed right into the open spark plug holes and into the corresponding cylinders - that would be BAD! |
||||||||||||||||||||