|
Maxim-X Custom Saddlebag Retainer Bar |
||||||||||||||||||||||||||||||||||||||||
|
After some consideration, the solution just popped into my head. I could form one continuous bar that would hook over one rear flasher, pass one side of the wheel, cross to the other side between the front and rear seats, then pass the other side of the wheel and hook over the other rear flasher. The rear portion of the front seat latch was such that a bar could simply rest on top of it on its way from one side to the other so it would be a simple matter to remove the retainer bar by simply removing the front seat and lifting the retainer bar off the flashers and off its front resting point. The physical layout was perfect... but I still needed the right materials to fit some basic guidelines.
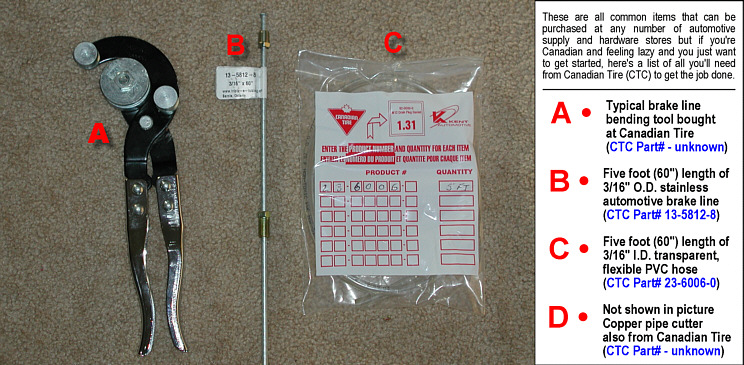
Tools & Materials
After a little more head scratching, I decided I'd use stainless steel brake line. A five foot length (as much as was necessay) was easy to source, cheap, rust resistant and, since I already had the brake line bending tool, it would also be easy to form. Whether it was strong enough to withstand the lateral force of a loaded saddlebag was something I could test after making the prototype. But, I wasn't happy with the last item on my list - would this contraption harm the paint or aluminum? To solve that problem, I decided to buy 3/16" O.D. (Outside Diameter) brake line and 3/16" I.D. clear hose. The plan was to form the retainer bar and later slide over the hose as a protective coating. Well, that was the plan anyway.
I'll start by detailing things that went well and move on to "prototype adjustments" afterwards. Step 1
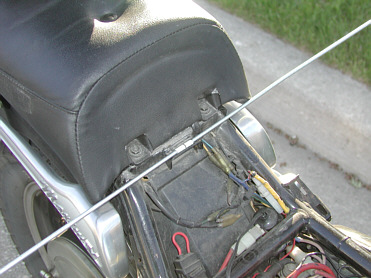
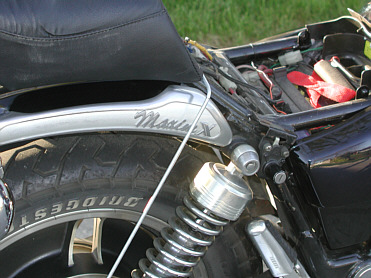
I started by marking the centre of the six foot (6') brake line and then laid it across the rear latch of the front seat as shown in the pictures below:
Step 2
I then began bending the first downward slope just beyond the grab rails as shown in the pictures below. The idea was to keep the retainer bar close to the side of the bike but far enough away to keep it from rubbing the grab rails. I settled on a 2cm clearance (or so) and I naturally followed the line of the shocks for aesthetics:
Step 3
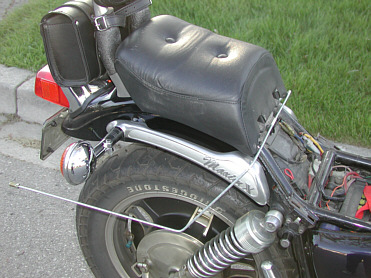
I arbitrarily picked the elevation of the horizontal segment shown in the pictures below. To me, the elevation looked good and was certain to end up near the very base of my saddlebags. In retrospect, to accommodate saddlebags that aren't quite as tall, I think I should have raised the horizontal segment somewhat... perhaps an inch or two higher:
Step 4
Bending the rear vertical segment was a little more tricky. I wanted to position the bend to the vertical in a way that everything before that bend could stay as it already was but several things didn't work out as perfectly as I had hoped. First, the bend from the horizontal to the vertical segment was too far back which meant the vertical segment would need adjusting to reach around the front of the flasher post. Next, my brake line bending tool wasn't capable of 180° bends so my efforts to achieve a full 180° bend at the flasher post resulted in some kinks as well as an unexpectedly short vertical segment. The cumulative effect of the "adjustments" in the final segments caused slightly slanted horizontal & vertical segments as shown in the pictures below:
Step 5
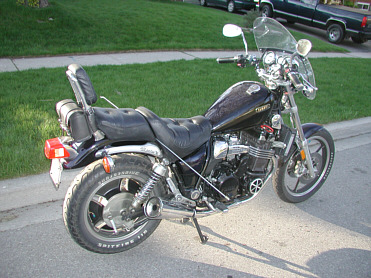
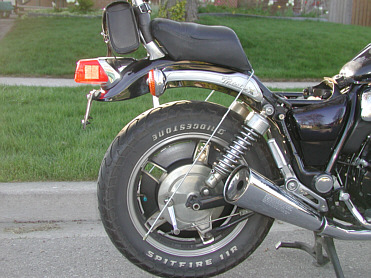
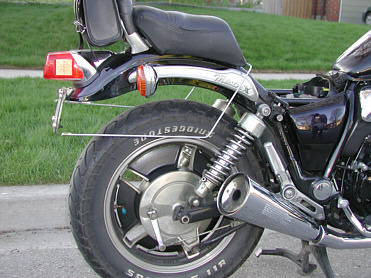
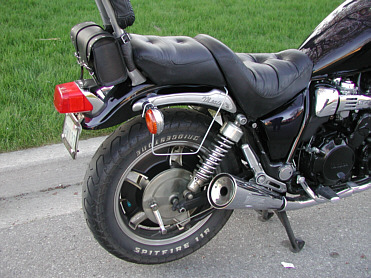
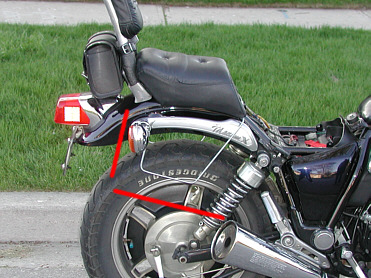
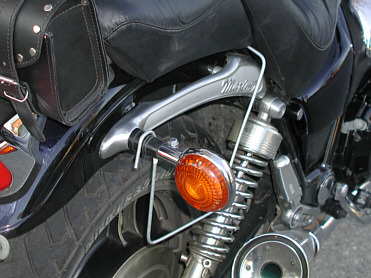
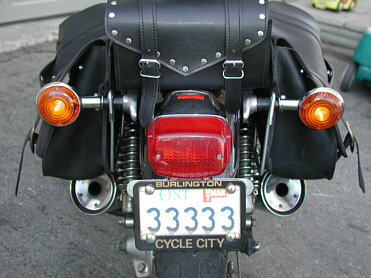
Despite the adjustments, this saddlebag retainer bar design worked out very well. From the different perspectives of the pictures below, it should be clear how the retainer bar hooks over the flasher posts and how the saddlebags are supported when it's all in place. There's also plenty of clearance at all points so that the retainer bar doesn't come into contact with any sensitive surfaces:
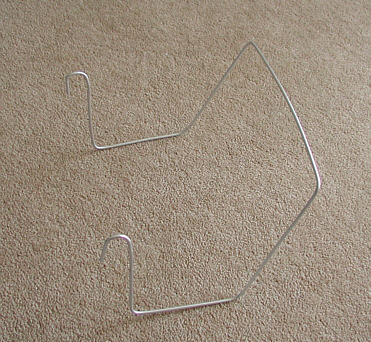
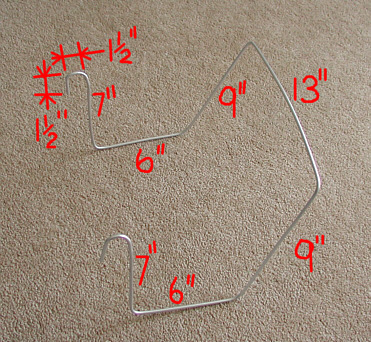
The end result was a simple, lightweight, symmetrical shape that could be dropped quickly and easily into place requiring only the removal of the front seat to do so. The (nearly) finished retainer bar can be seen in the pictures below with critical dimensions shown in the picture to the right:
Step 6
For this prototype, the only thing that remained to be done was to get the protective, clear hose onto the full length of the retainer bar. That was easier said than done. I managed to slip the hose on only just past the first 90° bend before it became too difficult to continue. Try as I might, it was a vain endeavour so I removed the hose completely, applied some lubrication and then began again. Even with lubrication, I developed blisters by the time the job was done. In retrospect, I should have slipped the hose onto the unbent brake line at the very beginning. Without bends it would have been a simple matter to slide the hose over the full length in a single motion. Another alternative might have been to spray the fully bent retainer bar with PlastiDip™ instead and give up on the clear hose entirely. Either way, this step should have been handled a little differently... but that's why I'm calling it a prototype.
Prototype Adjustments
One key adjustment would be to slide the clear hose over the brake line BEFORE bending the brake line, at the very beginning of the job. Bending the already hose-covered brake line with the same bending tool isn't a problem. It just requires consideration of how the extra width will effect bend locations and segment lengths.
Since most saddlebags for this application are less than thirteen inches (13") tall, a shorter saddlebag retainer bar would be better. I suggest making some adjustments to the dimensions so that the bottom horizontal segment of the retainer bar is raised by about two inches (2").
If you have the time, materail and patience to do so, you might want to create some practice bends to gauge how intended dimensions will change after applying various bends.
Before starting, make some sort of jig to help with the 180° bends over the flasher posts. The brake line bending tool will only get you through about 120° and without a jig of some sort to get you through the renaining 60°, you'll probably kink the brake line.
Addendum
If your Maxim-X no longer has the original flashers or posts, this saddlebag retainer bar design will still work after some minor adjustments. Assuming the flashers are still located in the same place but have just been replaced with typical mini after-market flashers, the final 180° bends will simply have to sweep a smaller diameter, something appropriate for the smaller after-market flasher posts.
If you're skeptical about the retaining capacity of bars made of only 3/16" brake line, you should know that they've been thoroughly tested. My first and only test involved loading each of my saddlebags with a fifteen pound (15 lb) watermellon. With the bike on its side stand, there was still plenty of clearance to the tire and the retainer bars did not bend noticeably. Since the time of the test, I've carried inconceivable loads in my saddlebags on a regular basis but the saddlebags have not come into contact with the tire again - the retainer is surprisingly effective.
Only one part of the design is a problem, albeit a small one. In regular use, the hooked ends over the flasher posts tend to creep up slowly. There is no reason for those ends to ever leave the flasher posts completely but I still find myself pushing them tightly back down just for appearances. Perhaps there's a simple and clever way to keep the hooked ends snuggly down on the flasher posts, but I haven't thought of it yet. If I think of something appropriate and easy, I'll post the change.
| ||||||||||||||||||||||||||||||||||||||||