 |
|||||||||||
|---|---|---|---|---|---|---|---|---|---|---|---|
|
|||||||||||
Maximum Maxim-X: Unpublished Archive
For years I've been gathering all sorts of information regarding the Maxim-X. Much of it has been officially published in the form of this web site. However, a large amount of very helpful information hasn't yet reached the web site because I simply haven't had time to make the additions. I'll get to it eventually but meanwhile the collection of information grows in an unpublished (until now I suppose ) archive. If you'd like to peruse the plethora of documentation, pictures, guides, instructions, tips, etc... which are as yet unpublished, feel free to visit the Maximum Maxim-X Archive at the following link: |
|||||||||||
Maxim-X Valve Shim Pool
Most people envision valve clearances as increasing over time and if that were the case it might not be so important to check clearances at defined intervals to bring them back to within specifications. Unfortunately, the reality is that valve clearances *shrink* over time. This is because valves are made of considerably harder material than cylinder heads. As such, each time a valve slams shut, it recedes a tiny bit further into the head by way of wearing the valve seat. Over time, the repeated impact of each valve can accumulate to a significant loss of clearance. In fact, many Maxim-X owners have seen their valve clearances vanish entirely, leading to valve floating, and that's especially bad. Allowing valve clearances to shrink out of existence can easily do harm to your engine in addition to having a dramatic and unwanted effect on performance. It also makes the job of checking clearances and replacing shims a lot more difficult. If you haven't already looked into it, you should be aware that Maxim-X valve clearance adjustment is recommended by Yamaha at 42000km (26600mile) intervals. That's a very long service interval - considerably longer than air-cooled XJs - and that helps offset the comparitive difficulty of the job by way of having to do it less often. Still, history has shown that interval to be a good one and exceeding it isn't especially wise. It is highly recommended to check valve clearances on the Maxim-X in accordance with the specified manufacturer service interval. It's not an easy job but it's not one you can ignore. The Maxim-X service manual contains detailed instructions and a shim table to help select replacement shims. I've also created an automated Excel spreadsheet to help with the shim calculations. You can download the Maxim-X Valve Shim Table spreadsheet here. I'd like to say you can rely on the spreadsheet alone but shim sizes are critical and there's potential for misuse so it's a good idea to compare the spreadsheet results to the service manual's shim table to make sure the calculated shim sizes are correct. When the time comes to do the job, you'll suddenly have an appreciation of just how many valve shims there are in a Maxim-X engine. In total there are 20 shims (as compared to only 8 shims in other XJs) and it's not unheard of to have to replace as many as 15 of them at once. Personally, I've never heard of all 20 shims being replaced at once but I've also never heard of fewer than 8 being replaced. In any case, the likelihood is that roughly a dozen shims will need replacing (on average) and at the current cost of CAD $8.97+tx=$10.14 per shim (Yamaha prices in Ontario, Canada - January 2008), you could easily be looking at a cost in excess of CAD $120 for shims alone. That's pretty pricey, particulalry for something that's only 7mm across. And when you consider that the cost has gone up by about 60% in only the past seven months (Zdeno Cycle: Spring 2007-$4.99+tx, Winter 2008-$7.99+tx), you have to accept the reality that CAD $120 could easily turn into quite a bit more as time passes. That's not a pleasant reality... but that's where the Maxim-X Valve Shim Pool can help. The Maxim-X Shim Pool is available to members of the XJ Owners Mailing List and it works like this: If you're tackling your X shim replacement, just measure your clearances (for which you'll need feeler gauges with a 6mm (1/4") wide tip and a low-end thickness of 0.04mm (0.0015") or less), decide which shims will need replacing and what size they'll be replaced by, then simply contact me (Harald Pfeiffer, aka HAP) with the details. You'll need to send me the old shims plus a flat fee to cover shipping of the replacements to any North American destination. Overseas destinations may cost slightly more. Where the flat fee exceeds the cost of shipping plus other charges, the modest remaining amount is used to help restock the shim pool when it becomes necessary (which cost approx. $600 in 2008 alone). Contact me to discuss the details. Although it's probable that the Maxim-X Shim Pool will be able to provide most of the shims you need, some will likely be unavailable. For instance, the pool may only have 9 of the 12 or so shims you need simply because others have drawn on the pool before you and drained it of certain sizes. That can't be helped and it may mean that you'll still have to buy some of your shims directly from Yamaha. Even so, don't let that stop you from making a contribution of shims to the pool. Shims that are no longer of use to you may be needed by other Maxim-X owners. Even odd sizes (sort of oximoromic when worded that way) are welcome. Whatever you're willing to part with may eventually help someone else and that's exactly why the Maxim-X Shim Pool was created. Your shim contributions are greatly appreciated whether there are 20 or as few as one. |
|||||||||||
|
Valve Shim Resizing This section talks about the process of resizing shims and why it can be done without any problems where the Maxim-X is concerned: Shim_Resize.html |
|||||||||||
Join the XJOG
Some people will tackle any problem themselves, whether they know what they're doing or not. That can lead to tragedy when working on the Maxim-X. I've found that there is absolutely no substitute for the knowledge of others who have already "been there, done that". And that's what the XJOG is all about. The "XJ Owners' Group" is a community of Yamaha model XJ owners who correspond for the love of their bikes. Even Yamaha itself can't provide the kind of support and information that is available via the XJ Owners' Mailing List and that's why it's the first item on this list. As a Maxim-X owner myself, I can say with complete conviction that most of what I know about the Maxim-X came by way of the XJ Owners' Mailing List in the form of helpful answers from other XJ owners. It's such an informative resource that I spend many hours every week reading and participating in the vast number of XJ posts. In fact, before I do any work on my own Maxim-X, I first run it by the guys on "the list". It has saved me a lot of grief several times. I can't imagine a dedicated Maxim-X owner not joining the XJOG and their Mailing List. As far as I'm concerned, it's practically manditory. Do yourself a favour - join and draw on the experience of others who are undoubtedly more qualified and more informed and who've seen it and done it all. |
|||||||||||
Buy the XJCD set
About as important as joining the XJOG Mailing List is buying the XJCD set. First proposed on the XJ Owner's list in 2000, the original XJCD concept was to collect parts diagrams for all XJ's to facilitate cross-referencing. Want to know if second gear from a 900 will fit a 650? Look them up on the CD and compare part numbers. We bought microfiche cards and a microfiche printer. To fill up some of the available space, we wrote articles and harvested some of the favourite tips from the XJ Owners' Mailing List. Members sent in an eclectic variety of stuff they thought was of interest. By the time XJCD v1.0 was out in April of 2001, it included a model code guide showing serial number ranges, etc., a selection of tech tips, a few magazine articals of the day, pictures of various members' machines, and so forth. And so, the XJCD was born. At the time, it was a good reference, but it wasn't all it could be. The (original) three of us charged with assembling it all lived in North America and had very little access to information about models shipped elsewhere in the world. There were many models we had no parts diagrams for. The CD was a collection of files,
organized into directories, but with no menu system - nothing to link it all together. Many members of this list looked at the pretty pictures of parts with no clue how to go
about replacing them. We knew at the time that we wanted more than we had, but the concensus was that we had enough to be of great use to the majority of list members. More was possible but people trying to fix their bikes just couldn't wait another year so XJCD v1.0 was released but before its release, XJCD v2.0 was already being planned. Since then, among other things, the XJCD has grown to include service manuals, parts diagrams and owners manuals for virtually all XJ models worldwide, organized with an HTML-driven menu system to aide navigation. We have even gone so far as to have Japanese texts translated where no English version was known to exist. We started with half a CD's worth of parts diagrams and pictures but now, with the release of XJCD v4.0, the set has grown to 3 CDs - almost 1,000 files comprised of tens of thousands of documents totalling 1.7 gigabytes. And, unlike the reproduced service manuals sold by Yamaha today, the manuals contained on the XJCD incorporate corrections for errors that have been uncovered by XJers over the past 20+ years. The XJCD set far exceeds anything you'll find through Yamaha or elsewhere and has truly become an XJ junkie's paradise. True to its origins, the latest feature is an automated Yamaha Parts Cross Reference application that quickly and efficiently compares part numbers for the user. No longer must one manually look up each model individually to find likely parts donors. Over 1.6 million parts are currently recorded in the database and, as always, we have plans for future expansion beyond that. Even now, the Parts Cross Reference application (developed by a select group of XJ Owners' Mailing List members and affecionately referred to as the "X-Ref") is being expanded and redesigned to improve its coverage, flexibility and, most importantly, to correct countless errors introduced into the data by Yamaha itself. I think it's safe to say that the XJCD set is the most comprehensive collection of all things XJ. Even Yahama would be hard-pressed to provide this level of information. To the Maxim-X owners out there, the XJCD set is completely invaluable. Need the $45 Maxim-X Service Manual - it's on there. Need to have a look at the original Maxim-X Owner's Manual - it's on there. Need a way to cross reference the part number for your 20-year-old foot peg in order to replace it with something newer - it's on there. Need to see an exploded view of the Maxim-X carburetors - it's on there. Need instructions on how to unsieze a brake caliper - it's on there. You name it - it's on there... and the cost is negligeable - just enough to cover the production of the CD set. If you own a Maxim-X, heck if you own any XJ model Yamaha, you absolutely MUST get the XJCD set. If you don't want to take MY word for it, join the XJ Owners' Mailing List and ask the members what they think. I'm sure the response will be unanimously in favour. The XJCD set simply doesn't disappoint. If you're wondering where to get the XJ CD Set, there is now a web site dedicated to that single purpose. Wherever you are on planet earth, you'll find all the ordering information on the XJ CD web site. |
|||||||||||
Finding Parts & Information
Those of you who own the coveted but rare 1985-86 Yamaha 750 Maxim-X have undoubtedly discoverd that it's a largely undocumented motorcycle. You won't see too many others riding one. Dealers will find it difficult, if not impossible, to find any parts listings. And, even an exhaustive Internet search won't lead to more than minor references of little value. This is an obvious weakness for the 750 Maxim-X - but why? The Maxim-X is indeed rare. It was only built for two years, in 1985 and 1986, which meant relatively few were introduced into the market in comparison to its V-twin twin, the Virago, which was produced for considerably more than a decade and for which information is plentiful. The Maxim-X was also the only Yamaha Maxim with a 5-valve per cylinder engine. Although much is documented about standard 2 and 4-valve Maxim's, little can be found about the 5-valve Maxim-X. In addition, ITC tariffs prompted Yamaha to produce a scaled down 700cc Maxim-X for sale in the United States, a much larger market than Canada. Consequently, you'll find much more listed about the U.S. 700 Maxim-X than its Canadian couterpart, the 750 Maxim-X. Since most motorcycle parts & service publications originate in the United States, few if any list the 750cc Maxim-X which was never sold in the U.S. If you've ever visited the parts counter looking for an oil filter, you would have realized like I did, that in order to find a filter for the 1985-86 XJ750X, you have to ask for anything but. To get what you're looking for it's necessary to ask for an oil filter for a 1992 XJ900, a 1991 XJ600 or even a 1990 FZR600. To complicate matters even more, suppliers other than Yamaha dealers are equally uninformed. You won't find the 1985-86 XJ750X listed anywhere at NAPA, FRAM, Canadian Tire or even K&N Filters. They may all have what you're looking for on the shelf but they simply don't have the appropriate listings and cross-referencing for the Canadian 750cc model, which makes it very difficult to find parts & information. Lately, however, I've managed to encourage certain suppliers (Canadian Tire included) to list the 750X in their databases and I'll continue to encourage the same of others. There is, however, one piece of useful information which will make finding parts & information less difficult. If you read any of the Maxim-X magazine articles posted on this web site, you'll discover that the Yamaha 700 Maxim-X is the missing link. The 700 Maxim-X is very nearly identical to the 750 Maxim-X in every way except for some minor cosmetic differences and of course that the stroke was shortened from 51.6mm to 48.0mm to achieve the smaller 700cc displacement for U.S. sales. After some research and some purchases of my own, I've been able to verify that many parts are indeed the same. At the very least, if you need brake pads, bulbs, coils or filters for your XJ750X, you'll get exactly what you need by asking for XJ700X parts. |
|||||||||||
Ignition Moisture Problems
If you own a Maxim-X, it's practically a certainty that you've found yourself stuck in the rain, unable to drive any further. If so, you're definitely not alone. The ignition coils of the Maxim-X were/are the single greatest weakness of this otherwise fantastic bike. Unfortunately, the Maxim-X, as well as many other Yamahas of the time, had ignition coils which would develop hairline housing cracks and subsequent spark arcing in moist environments. There were also problems with moisture infiltration and subsequent corrosion of internal connections. In my case, too often a thick fog would cause low RPM misfiring and a good bike wash was enough to keep the bike from idling at all. Tragically, ignition spray was never enough to solve the problem so I was forced to remove the coils to discover the source of the trouble. When I found MANY hairline cracks, I felt a degree of relief because I now had something I could fix. When I went to buy a set of used replacement coils however, I found that each and every coil pack, from several Yamaha models, had the same hairline housing cracks to one degree or another. The obvious conclusion - many of Yamaha's mid-80's to mid-90's coils weren't as good as they could have been. After some more research, I've discovered that the most common replacement coils for the Maxim-X are "Dyna Coils, type DC1-1" They're the most suitable replacements and it's been proven many times over that improve Maxim-X performance and reliability. Several people have written instructions on how to make the conversion to Dyna coils but I decided to provide my own instructions which don't require coil bracket modifications or any other permanent changes to the bike.. |
|||||||||||
 |
 |
Leaky Petcock
This section describes the all-to-common problem of a leaky vaccum petcock. It explains how to discover whether you have a leaky petcock, provides sourcing details for petcock replacement and offers pictures & instructions for anyone who wants to rebuild their vacuum petcock: Petcock.html |
|||||||||
Easy to Start
People who have difficulty starting their Maxim-X have often asked me how to improve starting, so I decided to add this section. Naturally, starting is easiest whith a healthy battery, a perfect igntion system and well-tuned carburetors. Each of those areas can effect starting in the following ways: Battery: While other bikes might kick into action even with an ailing battery, that's not true of the Maxim-X. Due to some weaknesses and common issues in the ignition system, it's genuinely difficult to start the X with a battery that isn't perfect or at least close to perfect. A sign of a less-than-perfect battery is that the bike won't start while cranking but tends to start just as you release the starter button. That bass-ackwards functionality is because the battery voltage drops too low to facilitate ignition while the starter is robbing it of voltage. Then, in that brief moment just after you release the starter button, battery voltage climbs again which suddenly becomes enough for ignition while the engine is still spinning due to momentum. In most cases, starting can be improved by installing a new battery. A new battery wouldn't experience the same voltage drop and would recover more quickly so it might resolve battery-related starting difficulty... but that may only be a patch for other problems. Spark Plugs: To most people it's obvious that fouled spark plugs can make it difficult to start anything, and that's no different for the Maxim-X. Without going into reasons why plugs may have become fouled, replacing them is essential for easier starting. Naturally, correctly gapping plugs, whether old or new, will also improve starting. That's all pretty obvious but what many people don't know is that spark plugs can be bad even when they look good. For that reason, if you're having trouble starting your X, it's often a good idea to replace the spark plugs regardless of how good you think they might be. Sometimes, X owners believe they have new plugs and on that basis they'll ignore the spark plugs as a potential cause of difficult starting... but they may be the wrong plugs. The Maxim-X uses either D8EA (1985) or DR8ES-L (1986) spark plugs but sometimes availability problems cause people to install different spark plugs. Doing so could inadvertently introduce starting problems under the wrong set of circumstances. There is, however, one type of non-stock spark plug that will almost certainly improve Maxim-X starting. From first-hand experience and from the reports of many other Maxim-X owners, it's clear that NGK Hyper Iridium DR8EIX spark plugs are the ultimate choice for the Maxim-X. Even when other issues continue to make starting difficult, if you can afford them, Iridium plugs will improve the situation dramatically. Spark Plug Caps: Many X owners don't give spark plug caps a second thought but they can easily be the root of hard starting problems. The stock T-140 caps are 5 k Ignition Coils: The Maxim-X coils weren't that good to start with and after 20 years they can contribute significantly to hard starting. The stock coils aren't very powerful and respond poorly at low RPMs and after they've had a chance to degrade and have corroded internally, they can often have difficulty delivering a good spark. If starting your X is difficult, a good place to begin looking for problems is by testing the primary and secondary coil resistances to see whetehr they're still within specification. If they're not, it may be possible to rebuild them to improve performance but they'd still be relatively low voltage coils. If coils are indeed the reason for hard starting, replacing them with high power after-market coils, like Dyna Coils, would be a massive improvement. Petcock: Depending on how long your bike has been parked, it may be necessary to switch the petcock to PRI (prime). The Maxim-X doesn't have a fuel pump but employs a gravity-fed fuel system instead. That has its benefits and its drawbacks. Where starting is concerned, it means that fuel might not be immediately available because a good engine vacuum is required to first open the petcock. When switched to PRI, however, fuel flows freely from the tank to the carburetor float bowls so you can be certain you have sufficient fuel for starting. Enrichment (choke): The Maxim-X doesn't have what people commonly refer to as a choke. A typical choke is designed to restrict air by closing choke plates while leaving the fuel supply unchanged thereby making the fuel:air mixture richer. For the Maxim-X, however, there is an enrichment circuit instead of a choke. When the so called choke lever is moved, a carburetor component known as a starter plunger is adjusted on each carburetor, which introduces more fuel to the same flow of intake air thereby making the fuel:air mixture richer. If that wasn't clear - a choke reduces air but an enrichment circuit adds fuel. Either way, the result is a richer mixture. To start the Maxim-X cold, it's necessary to enrich the mixture but that enrichment has its limits. Depending on the tune of your carburetors, it may not be necessary to swing the choke lever all the way over and if the carbs are tuned properly, it shouldn't be necessary to move the choke lever at all when the engine is already warm. If you're having a hard time starting your X even when you use the enrichment circuit, it may be because there is too much or too little enrichment. It's all a matter of degree. You might find that you improve starting simply by moving the choke lever less or more - try several positions. Carburetor Mixture: The fuel mixture settings of the carburetors are very much tied to the description of the enrichment circuit above and have a similar effect on starting. If your carburetor mixtures are already set too high or if they're artificially high by some other means like leaking float valves, then you might find it fairly easy to start your X when it's cold but more difficult when it's already warmed up. If the mixtures are high and you add to that by engaging the enrichment circuit, you might create a situation where your mixtures are so high that the engine doesn't want to run at all. If the carb mixtures are set too lean then swinging the choke lever over might only enrich enough for normal operation but not enough for cold starts. It's a fine balance. If mixture settings are too far off in either direction, starting can be a problem. You can get a very rough idea about your mixture settings by turning in your mixture screws and counting the number of turns until they seat lightly (return them to the same point you started from after you're done). For the Maxim-X Mikuni carburetors, the specifications show 2½ +/- ½ turns out. If you're far off from spec, it's probably time to tune your carbs. Doing so will undoubtedly improve starting. Carburetor Synchronization: Arguably, the most valuable change you can make to your X to improve starting (and performance) is to have the carburetors synchronized. Quite often, carbs are horribly out of synch and that imbalance makes it very difficult for the carburetors to work as they should. A carburetor imbalance can make starting difficult for some and almost impossible for others. Carburetor synchronization will definitely help improve starting. Air Filter: A clogged air filter may also make it harder to start your bike. If your engine can't breathe and operate correctly then it might be more difficult to achieve the conditions needed for starting. It's not the first thing I'd look after if starting was difficult but it's not something I'd ignore either Essentially, everything that contributes to the ease or difficulty of starting your Maxim-X is covered under the heading of "A Tuneup". With a proper tunep, there shouldn't be any reason left for starting to be difficult. If a tuneup won't happen any time soon but difficult starting is making you crazy, then there may be a technique that could help you get your X started more easily. In cold weather or after long periods of storage, you might find that the X will start for a moment but then die out. After that point, you'll probably find yourself cranking endlessly to no avail. Some Maxim-X owners solve this problem by removing the seat and using a puff of Quick Start spray but that can be awkward and it shouldn't be necessary. If you're successful in getting it started at all, the trick is to "get over the hump", as I call it. If you rev the engine up over 2500 rpm and keep it there to give it some momentum to get past the spot where it would normally die, then the engine will usually spin long enough for the carburetors to provide a fresh source of fuel/air for combustion just before the engine tries to stop again. After that, it should keep running. |
|||||||||||
Flashers - Long Cancel Delay
It's a small point but some Maxim-X owners, like myself, have complained about the automatic cancellation of the bike's flashers. Although flasher automatic cancellation usually works as designed, there is quite a long delay before it actually happens. Most Maxim-X owners will find that they have a sore left thumb after an extended ride, having manually cancelled the flashers themselves after every use. I've become use to it myself, but people have taken the time to replace the stock flasher module with a typical automotive unit. I like to keep everything essentially stock but that's something I'm still considering. |
|||||||||||
Maxim-X Model Comparison: XN ('85) vs XS ('86)
From time to time I'm asked what the difference is between the XN and XS models of Maxim-X so I thought I'd take the time to list each and every diference I've discovered. 1) For both the 700cc and 750cc sizes, Yamaha used the XN model classification in 1985 and the XS model classification in 1986. For the 750XN ('85) you'll find 1FL in the V.I.N. and for the 750XS ('86) you'll find 1MY in the V.I.N.. Similarly for the 700XN ('85) you'll find 1AA in the V.I.N. and for the 700XS ('86) you'll find 1NW in the V.I.N.. For those with California models, the 700XNC ('85) shows 1FJ in the V.I.N. and the 700XSC ('86) shows 1LT in the V.I.N..
2) The XN ('85) model has a circular Yamaha tuning fork emblem on the gas tank, while the XS ('86) model has an elongated oval Yamaha text emblem on the gas tank.
3) The XN ('85) model electrical test circuit tests only the oil pressure light, while the XS ('86) model test circuit tests both the oil pressure light and the fuel level light.
4) The XN ('85) model has a more agressive foot peg tread pattern than the XS ('86) model which has only parallel grooves in the rubber pegs. Also, the XN ('85) model has rubber sleeves which slide over the foot peg posts while the XS ('86) has a bolt-on upper tread surface for the foot pegs.
5) The XN ('85) model has unpainted, all-aluminum oil pump covers on either side of the crankcase. On the XS ('86) model, the oil pump covers are only partially unpainted and the recessed areas in the covers are painted black.
6) The XN ('85) model has an ignition pointer on the rotor while the XS ('86) model doesn't. The XS ('86) model has a different ignition rotor and the marks align with the pickup instead.
7) The XN ('85) and XS ('86) models initially had different carburetor jets as a result of rushing the 700cc engine into production but that was apparently resolved in 1985 such that both of the 700cc models' jets became the same (but some of the 750cc jets are different than those of the 700cc model).
8) I haven't been able to verify this but it seems that some early XN ('85) models may have had the more standard horns which were typically installed on the non-X Maxims. It looks like the later XN ('85) models were definitely equipped with the more stylish spiral horns found also on the XS ('86) models.
9) The XN ('85) models were documented as using NGK D8EA non-resistor spark plugs but the XS ('86) models were documented as using NGK DR8ES-L 5 k-ohm resistor spark plugs.
10) In 1985, Yamaha offered a backrest for the Maxim-X which apparently had a smooth surface, without any button imprints but it appears that in 1986 the same backrest was offered with a button imprint. Therefore, if you have an XN ('85) model that was originally equipped with a backrest, it probably won't have a button imprint but if you bought your XS ('86) model new, with a backrest, it will likely have the button imprint that wasn't there in '85..
11) The XN ('85) models had the word "YAMAHA" printed on the back of the rear seat while the XS ('86) models had the word "YAMAHA" printed on the fender above the taillight.
12) The XN ('85) models had a slightly narrower front fender with a small ridge around the front edge. The XS ('86) models appear to have had a slightly wider front fender with a smoothe contour and no such ridge.
13) The XN ('85) Canadian & International models had a speedometer which showed both kmh (outside) and mph (inside). The XS ('86) Canadian & International models had a speedometer which showed only kmh.
14) The XN ('85) models had no ornamental additions to the finish whatsoever. Only the XS ('86) models were offered with pinstriping on both the fuel tank and the side covers. Some models have chrome trim on the edge of the fuel as well but that was not a factory option - those are owner additions.
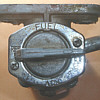
15) Another unverified difference involves the Maxim-X gas caps. It's possible that the XN ('85) model doesn't require the use of the key to close the gas cap while the XS ('86) model does require the key to close the gas cap. This has only been observed on a few models so it's completely unverified.
16) Another unverified difference involves the Maxim-X forks. It's possible that the XN ('85) model has the aluminum part of the forks polished on all sides whereas it appears that Yamaha took a bit of a short cut with the XS ('86) model and polished only the exposed part of the aluminum, leaving rough aluminum on the unseen parts of the outer surfaces. This has only been observed on a few models so it's completely unverified.
|
|||||||||||
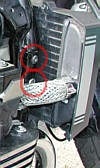 |
Loose Frame Bolts
This should almost be listed under the heading DAMHIKT ("Don't Ask Me How I Know That") because it's something I discovered very nearly the hard way and went on to verify with other Maxim-X owners. On the right side of the Maxim-X, about in line with the radiator, there are two frame bolts which fasten the upper half of the frame to the lower half. They're two socket head cap screws about 2 inches apart so they're easy to spot. These two fasteners seem to have a bad habit of coming loose. Because they're not equipped with lock washers, the bolts tend to work themselves loose and sometimes even fall out leaving the upper and lower halves of the right side of the Maxim-X frame completely separated. THAT'S NOT GOOD. Take a quick look at them some day to make sure they're tight. It might keep you from finding your Maxim-X engine on the street someday when your frame breaks. |
||||||||||
 |
Seafoam
This section is all about Seafoam. What is it? How's it used? What are the benefits? Where can you get it?... and anything else I can think of related to Seafoam: Seafoam.html |
||||||||||
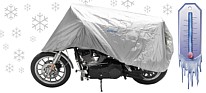 |
Winterization - 14 Tips
This section has 14 tips for winterization and long-term storage of your motorcycle. If you need to know how to prepare, this is the place to look: Winterization.html |
||||||||||
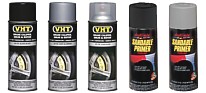 |
Recommended Paints
This section contains information about typical paints used for Maxim-X restoration. I've listed the ones that I feel are the best for certain areas with some comments as to why: Paints.html |
||||||||||
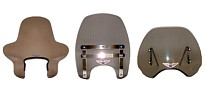 |
Choosing a Windshield
This section contains a list of things to consider when selecting a windshield for your Maxim-X: Windshields.html |
||||||||||
|
Badges & Emblems
This section identifies all badges & emblems which adorned the Maxim-X and also shows some alternatives since factory badges are no longer available: Badges_Emblems.html |
|||||||||||