Maximum Maxim-X |
||
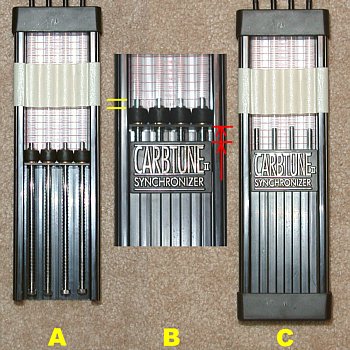
A |
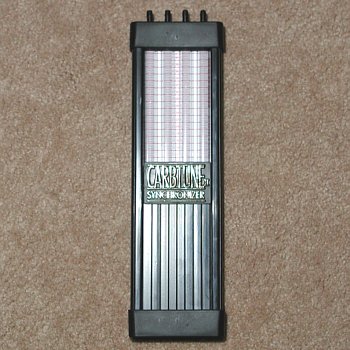 |
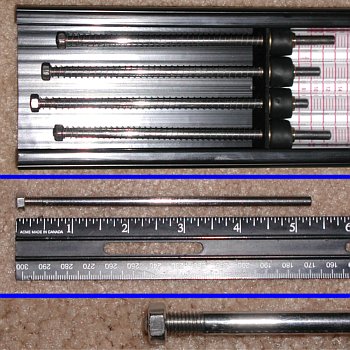
The Morgan Carbtune II is a multi-gauge carburetor vacuum synchronization tool and a favourite among Maxim-X owners. Rather than using unsafe mercury in long tubes, the people at Morgan designed the Carbtune II to use metal rods in precision-machined guides. This has a number of advantages, among which are smaller construction, easy portability and non-toxic components. With this style of tool, however, from time to time engine blow-back forces small amounts of fuel & oil vapour into the vacuum gauge tubes which, when dry, leaves behind a residue that may cause rods to stick or move less freely in their guides. At that point, it becomes necessary to carefully disassemble the Carbtune II to clean its components. However, before going ahead uninformed, here are some helpful tips & instructions to do the job right. |
B |
"IMPORTANT - Each rod and spring must go back in its original position and the right way up. Do not mix. Do not put loose springs together as they will tangle. For simplicity only remove one rod at a time for cleaning. Carefully remove spring from rod and polish rod and inside of rod guide with a cloth. Do not scratch. For severe staining use a brillo pad or the finest steel wool to polish rods. Wash and dry thoroughly afterwards. Only assemble when dry. Do not remove top cap. Do not remove clear tube assembly from casing as it may affect rod alignment. Do not disassemble tubes from the black seals as they may not reseal.But remember 'if it ain't broke don't fix it'." |
The people at Morgan wrote the adjacent cleaning instructions for the Carbtune II. When it first became necessary for me to clean my own Morgan Carbtune II, I referred to these instructions for help but discovered that I had more questions as a result. That's all they wrote about cleaning and much of it means very little without knowing how the Carbtune II is constructed internally. That's why I've taken the time to expound on the original instructions, with more detail, pictures & some tips. |
1 |
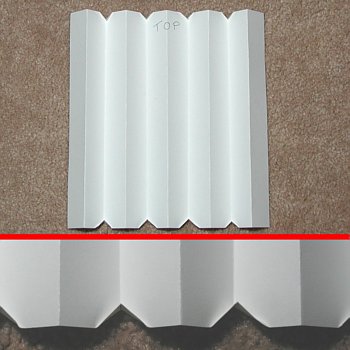 |
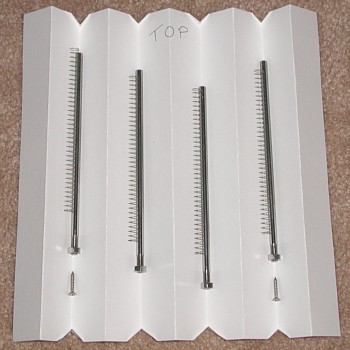
When I first cleaned the Carbtune II, I had every intention of removing only a single rod at a time as suggested in the original instructions. When a second rod accidentally fell out on its own, I realized that it might be preferable to remove ALL the rods at once, despite the method suggested by Morgan. The only important thing to remember was that the rods and springs were supposed to return to their original positions so I decided to make something simple to keep them in order as I worked. To do the same, before you begin cleaning simply find an 8½" x 11" standard sheet of cardstock. Divide the length into 10 equal divisions and fold the cardstock into an accordian shape with 5 peaks and 4 troughs, then mark one end as the "Top". I also decided it would be wise to fold up the corners of the troughs (much like the tail of a paper airplane) to keep the components from sliding off if I had to move everything for some reason. The result was a simple tray to hold components while maintaining their relative positions & orientations. |
2 |
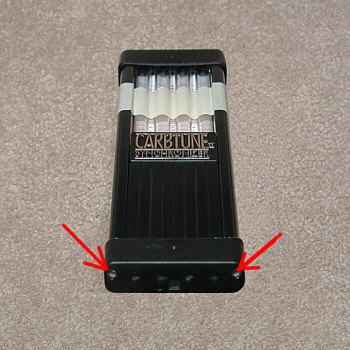 |
Before continuing with disassembly, stretch a strip of masking tape across the front of the Carbtune II to keep all 4 vacuum tubes in place in the casing. Accidentally spinning tubes and pulling them out of the upper cap is not as difficult as you might think and the tape will make it easier to adhere to that part of the original Morgan instructions. Rather than stretching the tape tightly across the front, however, allow it to drape somewhat between each of the vacuum tubes and then press the tape securely into place. Now it's safe to begin disassembly. Lay the Carbtune II on a flat surface or hold it upside down, then with a #1 Phillips screwdriver, remove the two self-tapping screws which fasten the bottom cap to the casing. If the Carbtune II isn't horizontal or upside down, when the screws are removed, the bottom cap might fall off and you might find that one or more rods inadvertently slide out of their guides and onto the floor, making it impossible to know in what order to replace them. |
3 |
 |
After the bottom cap is removed, you'll discover that there is a foam or rubber strip inside the cap which is there only to soften the blow of the rods as they fall back down and bottom out on the casing after the vacuum source is disconnected. The placement of the rubber strip is unimportant as long as it lies flat in the bottom cap. With the bottom cap removed, and keeping the Carbtune II either horizontal or upside down, it's now possible to slide the front cover panel (with logo) toward the open end where it can be removed and set aside. |
4 |
 |
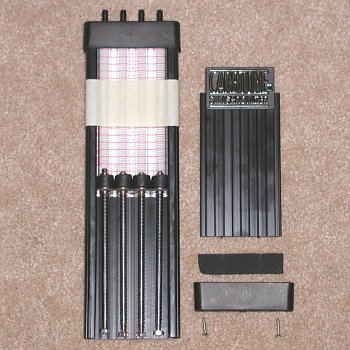
At this point, the rods, springs and guides can be clearly seen. The rods are 5¼" long with a nut at the bottom of each. The nuts are the primary reason that rods must be replaced exactly where they came from. They are used to preload respective springs and to equalize the response of each cylinder - essentially to fine tune the gauges. In addition, the rods pass through 5/8" guides, each of which may differ minutely. That's why it's so critical to keep all the parts in their original order. Only the rods and the guides need to be cleaned from time to time, so there's no reason to handle the springs or other components excessively. Doing so will almost certainly effect relative readings within each gauge. |
5 |
 |
With the Carbtune II lying on a horizontal surface, carefully pull each rod, spring & nut assembly out of its respective guide. Without stretching them, remove the springs from their respective rods and collect all the parts on the folded cardstock sheet, being careful to keep everything in its proper order. I set the bottom cover screws in there as well, for no other reason than to keep from losing them. |
6 |
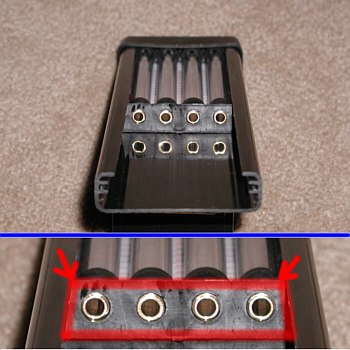 |
At this point, the Carbtune II is disassembled as far as I recommend - the top cap shouldn't be removed. At the bottom of the rod guides, you'll see a thin, black plastic alignment plate (outlined in red in the adjacent picture) which slides over the ends of the rod guides for their alignment. I suspect a similar plate maintains tube alignment under the top cap as well. The lower guide plate is not a tight fit over the guides - it just slips on easily and falls off just as easily. If you're not careful and allow the plate to fall off the guides, you might dislodge the tubes and cause the misalignment described in the Morgan instructions. I suspect that the designers at Morgan must have encountered some alignment anomalies which made it necessary to stress alignment concerns in their original instructions. Therefore, I decided there was no value in further disassembly. Cleaning is possible from this point with complete success. |
7 |
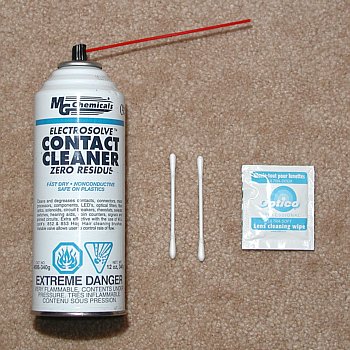 |
The accuracy of the Carbtune II depends heavily on tolerances so the cleaning solution shouldn't be abrasive, shouldn't leave a residue and shouldn't encourage corrosion. To satisfy all conditions, I chose fast drying alcohol wipes to clean the rods and a Q-tip moistened with fast-drying, no-residue electrical contact cleaner. Just wipe each rod once or twice with a moist alcohol wipe being careful not to adjust the nut at the end in the process. Then insert the Q-tip moistened with contact cleaner into each brass guide once or twice being careful not to apply any lateral force to the guides. Cleaning should be done gently with the alignment of parts always in mind. It doesn't take a lot of effort or any scrubbing to clean away the fuel/oil residue but depending on how much there is, you may need more than a single alcohol wipe and perhaps a few Q-tips. Only seconds afterwards, the rods and guides should be clean and dry and ready for reassembly. |
8 |
 |
Reassembly will be in the reverse order but with some words of caution. First slide each spring over its respective cleaned rod. Then, with the Carbtune II on a horizontal surface, insert each rod assembly into its respective guide, doing so only such that the rod protrudes from the inner edge of the guides (Fig. A & B). Do not push the rod assemblies in any further - they should be allowed to fall into place under gravity alone after you turn the Carbtune II upside down again. When the rod assemblies have settled into place, first verify that the guide plate is correctly seated, then return the Carbtune II to a horizontal surface and reinsert the front cover panel (Fig. B). When in place, the cover panel will press against the guide plate to hold it in place. Lastly, holding the Carbtune II upside down (to keep the rod assemblies from falling out), reinsert the foam piece and replace the lower cap. |
9 |
|
As you prepare to put the screws back into the bottom cap, remember that they are self-tapping and don't have all that much to hold onto. If you over-tighten the screws, you'll easily strip the plastic into which they're being threaded and leave little for the screws to hold onto. After the bottom cap has been replaced, remove the strip of masking tape holding the tubes in place and you're done. If you did everything correctly, the Carbtune II should look the same as when you started; gauge balance should have been maintained and the rods should all move freely when perfectly vertical. That's all there is to it. ***NOTE: To ensure free movement of the rods, achieving a perfectly vertical alignment of the Carbtune II is desired but the vacuum hoses connected at the top of the gauges tend to pull the Carbtune II off vertical. To combat that problem, loop a tie wrap (aka zip tie) through the slot in the bottom cap then hang some appropriate weight from the tie wrap (not so much that the screws pull out). I simply clamp a Vice Grip onto the tie wrap - that seems to do the trick. It's also important to be careful when removing the hoses from the Carbtune II for storage; twisting the hoses can change the tube alignment which can result in sticking rods or even vacuum leaks depending on how aggressively the hoses are handled. |